
Are you struggling to convert SVG files into React components that work and look clean in your project?
You’re not alone. Many React developers face issues like importing, optimizing, or animating SVGs without breaking their UI.
In this guide, we’ll simplify SVG-to-React conversion so you can easily turn scalable graphics into reusable components — with the right tools, code tips, and examples.
Whether you’re building your next project with Tailwind CSS, Framer Motion, or React Spring, this tutorial will help you convert SVG to JSX, TSX, or full React components in minutes and understand why this approach improves performance and maintainability.
Why Convert SVG Files to React Components?

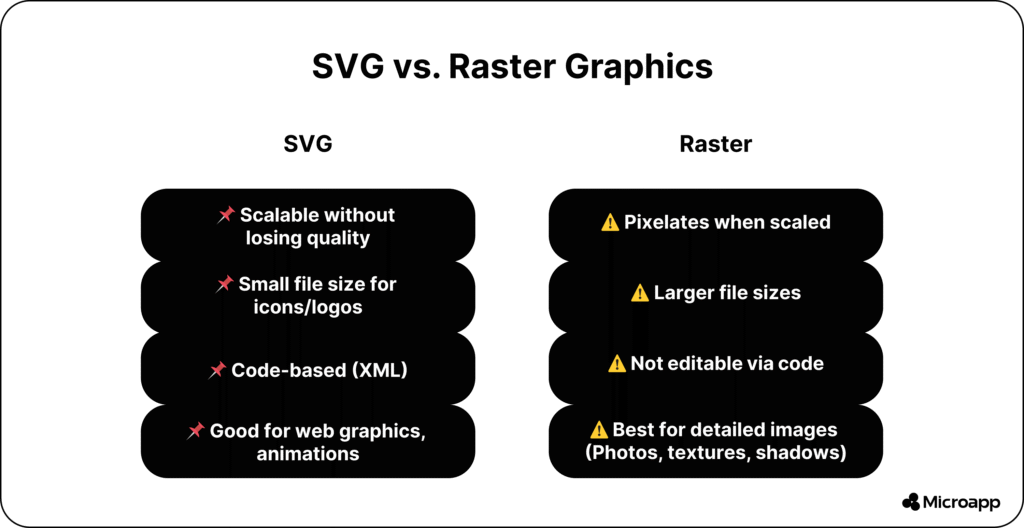
SVGs (Scalable Vector Graphics) are lightweight, resolution-independent, and perfect for responsive web design.
When converted into React components, they become part of your JavaScript ecosystem, making it easier to customize, animate, and reuse them anywhere in your app.
Benefits include:
- Inline styling and props for dynamic changes
- Faster rendering and fewer HTTP requests
- Cleaner code and reusable UI elements
- Easy animation with React Spring or Motion.dev
- Styling control that applies CSS transforms or animations via CSS animation.
- Add ARIA labels and alt text directly inside the component.
💬 FAQ: Why not just import SVG as an image?
When you import SVG as an image, you lose control over styling and interaction. Converting it into a React component lets you manipulate it like any other JSX element.
👉 Want to understand why SVGs outperform other formats? Check out our post on The Benefits of Using SVG.
What is an SVG to React Converter?
An SVG to React Converter transforms static SVG files into interactive React components so that you can manipulate, animate, and style them dynamically in your app.
SVGs are XML-based graphics, and React requires JSX-friendly syntax. Instead of fixing attributes like class → className manually, our microapp automates the process.
💬 FAQ: What’s the difference between SVG and JSX?
JSX is React’s syntax for writing HTML-like code in JavaScript. Converting SVG to JSX ensures your graphics work natively inside React components.
How to Convert SVG Files to React Components (Step-by-Step)
Let’s look at the simplest and most efficient ways to convert SVG files into React or JSX components.
1. Use the Microapp SVG to React Converter Tool
Skip the manual process.
- Head to our free SVG to React Converter tool — upload your SVG and instantly get JSX or TSX code.
- Upload your SVG file using the drag and drop or browse to select your file
.svg. The converter handles icons, logos, or complex illustrations of any size.
💬 FAQ: Can I convert SVG to JSX instead of React?
Absolutely, the converter automatically outputs JSX syntax, perfect for React apps or standalone components.
- Watch it convert automatically once you upload your SVG file; it becomes a React component. The tool optimizes the markup for JSX — replacing
classwithclassName, fixing attributes, and formatting clean code for you.
💡 Tip: This not only saves you time but also prevents common errors like invalid attributes or mismatched syntax that break builds.
Now, you can customize your component to modify:
- Size — use props like
widthandheight - Color — set
fillandstrokeprops directly - Cleanup — remove comments, hidden elements, or unused IDs
- Animation — integrate libraries like React Spring or Motion to add life to your icons
💬 FAQ: Can I export SVG to TSX for TypeScript?
Yes. Copy the generated JSX and rename the file with an .tsx extension. The code is TypeScript-friendly.
👉 Discover how to image compress your pictures for improved online speed.
2. Manually Convert SVG to JSX
If you want to learn how it works under the hood:
- Open your
.svgfile in a code editor. - Copy the
<svg>code. - Paste it into your React component file.
- Replace any attributes like
class→className, andstroke-width→strokeWidth. - Wrap it in a function:
const Logo = () => (
  <svg width="100" height="100" viewBox="0 0 100 100">
    <circle cx="50" cy="50" r="40" fill="blue" />
  </svg>
);
export default Logo;
💡 Tip: Use Chrome DevTools to inspect SVG code directly from any site and learn how designers use paths, fills, and strokes effectively.
3. Convert SVG to TypeScript (TSX)
Working in TypeScript? No problem — your converted SVG works almost identically.
Just ensure your .tsx file includes proper types:
import { SVGProps } from "react";

const Icon = (props: SVGProps<SVGSVGElement>) => (
  <svg {...props}> ... </svg>
);
This method improves IntelliSense, auto-completion, and helps you catch typing errors early.
4. Optimize SVG Before Conversion
Before you import your SVGs, it’s crucial to clean and optimize them. Use tools like SVGO or online compressors to remove unnecessary metadata or comments.
You can also learn more about SVG file performance from our guide on Pros and Cons of Using SVG Formats.
Quick Comparison Table
| Method | Best For | Tools Needed | Skill Level |
|---|---|---|---|
| Microapp Converter | Instant JSX conversion | None (online tool) | Beginner |
| Manual JSX Conversion | Learning or debugging | Code editor | Intermediate |
| TypeScript TSX | Typed React apps | TypeScript setup | Advanced |
Common Issues When Importing SVG into React (and How to Fix Them)
While importing your SVG into React is usually straightforward, you might occasionally run into a few issues. Don’t worry, here’s how to fix them quickly.
1. SVG Doesn’t Display Correctly
Sometimes, your SVG might not appear at all or look distorted. This can happen if:
- The SVG code isn’t correctly formatted
- There’s a typo in your import statement
- A CSS rule is overriding the SVG’s visibility
💡 How to Fix It: Double-check your SVG syntax and import statement. You can also inspect your SVG in Chrome DevTools to locate hidden or overwritten attributes.
2. SVG Is Not Interactive
If your SVG doesn’t respond to hover or click events, it might be because you imported it as an image file (<img src="..." />) instead of a React component.
💡 How to Fix It: Import your SVG as a React component instead:
import { ReactComponent as Icon } from './icon.svg';
Or use the Microapp SVG-to-React Converter to generate JSX instantly.
3. SVG Doesn’t Update with State or JavaScript
When manipulating your SVG dynamically, you might find that the SVG doesn’t react to state changes or DOM updates. This often occurs if your SVG is treated as a static image rather than an inline component.
💡 How to Fix It: Use inline SVG or wrap your SVG code inside a functional React component. Combine this with React hooks, like useState or useEffect to update it when your component changes.
Pro Tips for Developers
Tip #1: Keep your SVGs simple. Remove unnecessary layers or paths to reduce file size.
Tip #2: Always preview your converted component before committing it to production.
Tip #3: For large projects, store your SVG components in a separate /icons or /components/svg directory for easy reusability.
Tip #4: Combine your converted SVGs with a React + Tailwind setup for effortless styling.
Ready to Simplify Your Workflow?
Manually rewriting SVGs into JSX is a thing of the past. To simplify converting SVG files to React, we recommend using the Microapp SVG to React Converter.
You can instantly transform your icons and graphics into flexible React components — optimized, customizable, and production-ready.
Don’t waste another minute tweaking XML syntax — convert, customize, and code smarter today.